A two-day training of Flexirohr installation
two Britons in Finland…
Monday
A beautiful morning with a hint of autumn. I am driving towards a worksite in Sipoo Finland. I arrive at 9:15 a quarter of an hour before the agreed time. There is an elementary school beside the worksite. I wait at the worksite and start to unpack the installing equipment from the van. A young, bold girl comes from the nearby school yard and asks, “What are you doing?” while I am lifting the welding gear from the van. “We will soon start welding pipes to each other” but the girl runs away to her friends. While I turn around, I see the Audi of our British friends arriving. I show them the parking place. The right sided traffic is not easy for the guys!
Andy steps away from the car: “The steering wheel is on the wrong side”. We greet and Dan Holmes needs a cig after the ride.
After finishing small talk (does not last long…) we get down to business. I show the sections to be relined and we walk through the worksite. We take a peek into the manholes (concrete DN 800 mm) and I explain the measures we need to do before the relining.
We unload the welding equipment beside the pipe trailer and start the welding training. We place two welding rigs side by side and attach the pipes in the welding rigs. First, I show how to adjust the pipe cutter. Then the cleaning of the pipe and trimming of the pipe end. The welding ring is placed inside the corrugation of the trimmed pipe end. Then the welding ball (inside the pipe) is located in the welding area. The welding rig is closed and fixed. After the closing of the rig the welding ball must be pressurized with 1,5 bar. At this point everything is ready for the actual welding, which is fully automated. The welding machine is turned on, the barcodes (including the welding parameters) read, and the first welding started. While the first welding is going on, we move to the other machine and let Andy do the first welding by himself. The moves look a bit different, and I wonder why, until I notice Andy is lefthanded! Everything goes as planned, only the pressurizing of the welding ring was forgot at the first time. After Andy, it is Dan’s turn. All the correct steps were made, except for the welding ball…
After the welding and cooling time, I open the rig and make a visual inspection of the welding.
The guys repeat the welding process until we have achieved the two pipe strings of 54 meters and 30 meters. (“Repetitio mater studiorum est”). After the welding, I explain the common mistakes made during the welding. An example of this is to show how the welding bead looks like when the welding ball is missing. The little tricks of the welding process are usually learned during this first day of training. This is the case also with Andy and Dan.
After the relaxed training we pack up and head for a late lunch in the local Kebab restaurant. The actual training ends at 14:15.
Tuesday
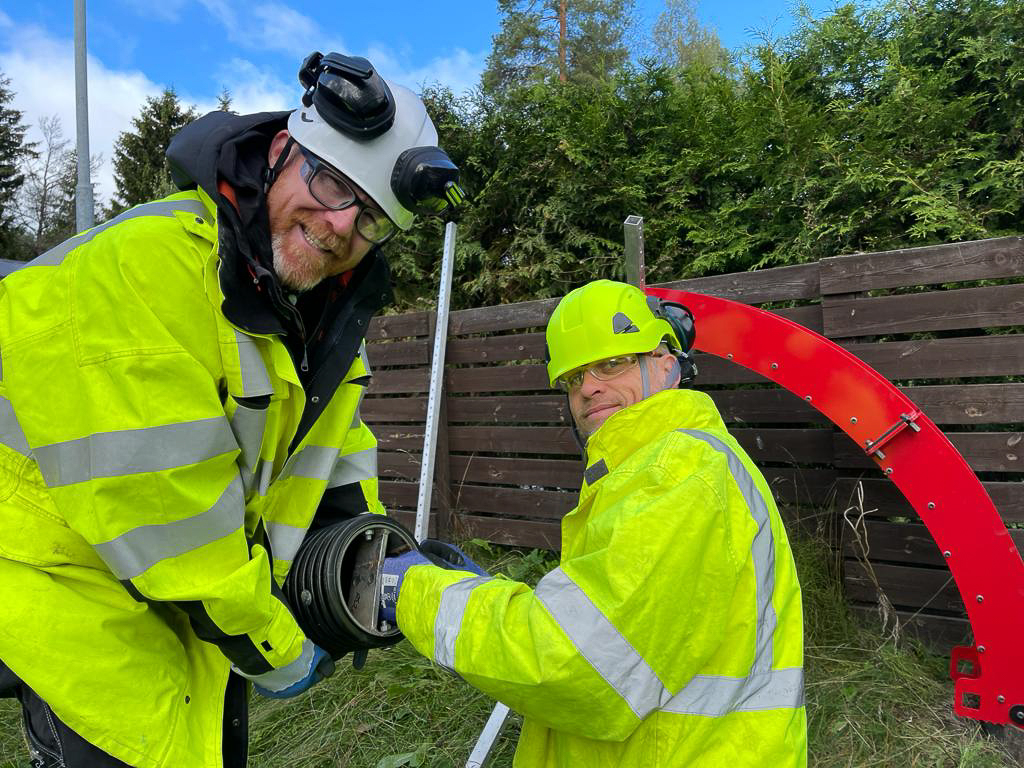
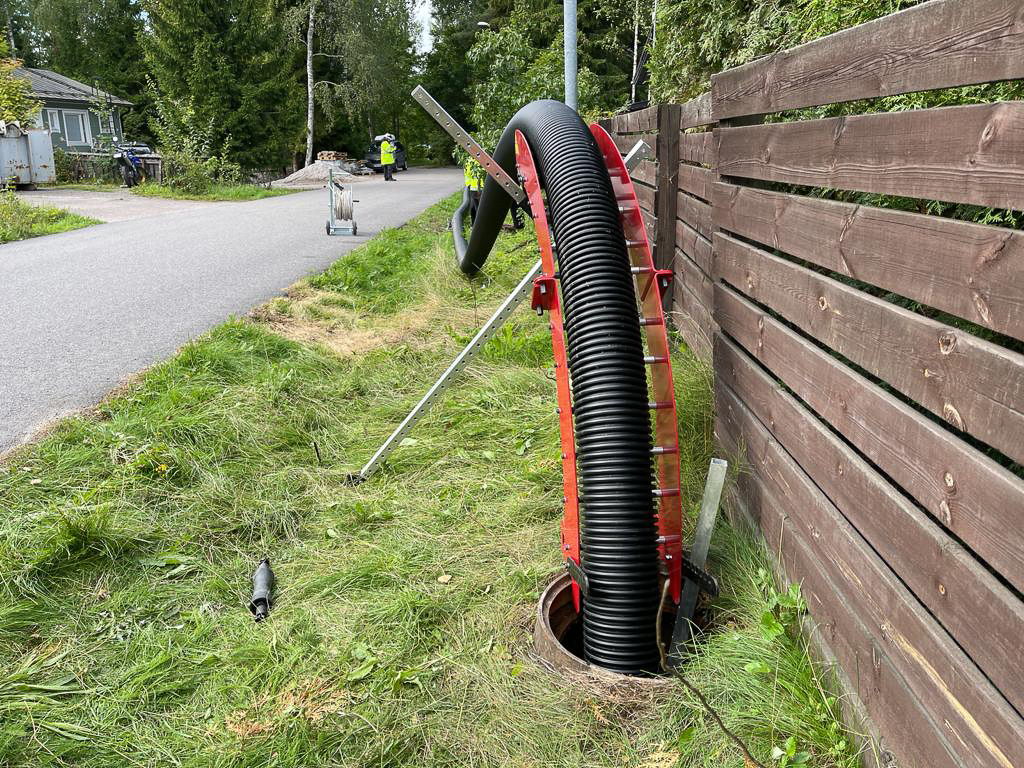
We arrive at the worksite and our friends arrive too. The action starts…for me. The first job is to see if the host pipe ends in the manhole need preparing. Some extra place is needed in the manhole. There are no volunteers, so I go down to the manhole with a Hilti demolition hammer! After this important step Andy and Dan get to work. I unload the installation equipment from the van. Now it is their task to figure out the placement of the equipment in the entry and receiving manholes. I have given the tip where to place the winch. After some thinking the wire guide and the pipe guides are in the right places. The upper and lower pipe guides are assembled with the extension bars and placed in the manholes. The wire is pulled inside the host pipe with the GRP push rod. After that the welded pipe string is carried manually to the entry manhole. A comment from the guys: “The pipe is light and easy to carry”. We install the pulling head and everything is ready for the pulling in. Three engineers from the water company arrive to follow the installation.
I explain the functions and safety issues of the wire winch to Andy, who was in charge of winching. I go to assist Dan in the upper pipe guide end. The winch starts to pull the pipe in and enters the lower pipe guide. We stop and push the pipe slightly to reach a good position in the lower pipe guide. The winch is started again, and the pipe vanishes into the host pipe. We follow with the engineers the entry of the pipe in the middle manhole. After it arrives there, the pulling is stopped for a while. I check with Andy what happened. He has pushed unintentionally the emergency switch of the winch with his helmet! We start the winch again and in minutes the pipe enters the receiving manhole. I go down to cut the pipe and remove the pulling head. We let the pipe rest for a couple of minutes before the wedges are installed between Flexirohr and the host pipe. The wedge locks the pipe in its final position.
The next section is pulled with the light, portable battery winch and a rope. Dan figures out swiftly the locations of this equipment. The rope is pulled in with push rod, frame of the winch and rope guide installed on top of the manhole. We are ready to pull. Andy takes the entry manhole and Dan the winching. Before the pulling we get a guest – the Managing Director of the waterworks – to the worksite. It is always nice to chat with a happy customer! The pulling in goes easily and the speed of the battery winch is even higher. Schoolboys passing with bikes stop and look in awe while the pipe vanishes into the manhole. Future trenchless specialists, maybe?
The pipe is ready at the receiving manhole and the same cutting and wedging procedures are made. We pack the gear in the van and head for lunch! After lunch we return to seal the ends of the pipe with fast setting mortar.
Andy and Dan did a brilliant job in the training. Thanks to the good attitude and willing to learn they are ready to help their customers in UK and elsewhere. We are ready to conquer Britain with Flexirohr!
Information of the worksite:
- Jetting and CCTV done the week before
- Manhole diameter: 800 mm
- Depth of the line: 200- 250 cm
- Hos pipe: Concrete DN 225 mm
- 3 sections made with two pulls, totally 80 meters of DN200 Flexirohr
- Time used for training:
- Monday: welding 9:30-14:00
- Tuesday: relining 8:30-14:00
- Tuesday: sealing the ends, evening the manhole bottoms 14:30-16:30
- Jetting and CCTV of the relined pipe a week after the relining
Text: Juha Kangasniemi